Kia Cadenza: Air Conditioning System / A/C Pressure Transducer Repair procedures
Kia Cadenza YG 2016-2025 Service Manual / Heating,Ventilation, Air Conditioning / Air Conditioning System / A/C Pressure Transducer Repair procedures
| Inspection |
| 1. |
Measure the pressure of high pressure line by measuring voltage output between NO.1 and NO.2 terminals.
|
| 2. |
Inspect the voltage value whether it is sufficient to be regular value or not.
|
| 3. |
If the measured voltage value is not specification, replace the A/C pressure transducer. |
| Replacement |
| 1. |
Disconnect the negative (-) battery terminal. |
| 2. |
Recover the refrigerant with a recovery/charging station. |
| 3. |
Disconnect the A/C pressure transducer connector (A).
|
| 4. |
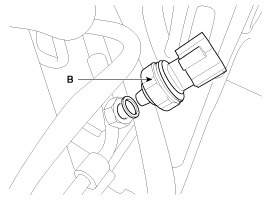
Remove the A/C pressure transducer (B).
|
| 5. |
Installation is the reverse order of removal. |
 A/C Pressure Transducer Description and Operation
Description
A/C pressure transducer convert the pressure value of high
pressure line into voltage value after measure it. By converted voltage
value, engine ECU controls cooling fan by operatin ...
 Evaporator unit Description and Operation
Description
The evaporator temperature sensor will detect the evaporator
core temperature and interrupt compressor relay power in order to
prevent evaporator freezing by excessive cooling. ...
Other information:
Kia Cadenza YG 2016-2025 Owners Manual: Lighting control
The light switch has a Headlight and a Parking light position. To operate the lights, turn the knob at the end of the control lever to one of the following positions: (1) OFF position (2) Auto light position (3) Parking & Tail light (4) Headlight position When the light swit ...
Kia Cadenza YG 2016-2025 Service Manual: Canister Repair procedures
Removal 1. Turn the ignition switch OFF and disconnect the negative (-) battery cable. 2. Disconnect the ventilation hose (A) from the fuel tank air filter. 3. Disconnect the vapor tube quick-connector (B) and the quick-connector (C). 4. Remove installation bolts (A) and then remove ...


