Kia Cadenza: Lighting System / Front Fog Lamps Repair procedures
Kia Cadenza YG 2016-2025 Service Manual / Body Electrical System / Lighting System / Front Fog Lamps Repair procedures
| Inspection |
| 1. |
Disconnect the negative(-) battery terminal. |
| 2. |
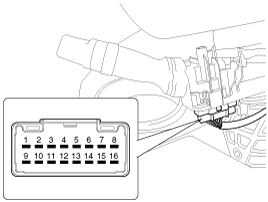
Remove the lighting switch of the multi-function switch. (Refer to the multi-function switch) |
| 3. |
With the front fog lamp switch, make sure that continuity exists between the terminals below.
If continuity is not as specified, replace the multi-function switch.
Front Fog Lamp
|
| Removal |
| 1. |
Disconnect the negative (-) battery terminal. |
| 2. |
Remove the front wheel housing.
(Refer to Body - "Front Bumper") |
| 3. |
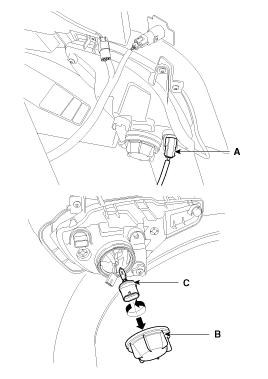
Disconnect the front fog lamp connector (A) and remove the cover (B).
|
| 4. |
Replace the front fog bulb (C) turning it in the counterclockwise direction. |
| 5. |
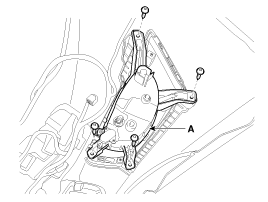
Remove the front fog lamp (A) after removing the screws.
|
| Installation |
| 1. |
Install the front fog bulb. |
| 2. |
Reconnect the lamp connector. |
| 3. |
Install the front wheel housing. |
 Rheostat Repair procedures
Inspection
1.
Disconnect the negative (-) battery terminal.
2.
Remove the passenger compartment juction box cover.
3.
Remove the side cover (A).
4.
Remove the crash pad side switch ass ...
 High Mounted stop lamp Repair procedures
Removal
1.
Disconnect the negative(-) battery terminal.
2.
Remove the roof trim.
(Refer to Body - "Roof Trim")
3.
Disconnect the connector of high mounted stop lamp.
4.
Remove the hig ...
Other information:
Kia Cadenza YG 2016-2025 Service Manual: CVVT Oil Temperature Sensor (OTS) Repair procedures
Inspection 1. Turn the ignition switch OFF. 2. Disconnect the OTS connector. 3. Remove the OTS. (Refer to "Removal") 4. After immersing the thermistor of the sensor into engine coolant, measure resistance between the OTS terminals 1 and 2. 5. Check that the resistance is within t ...
Kia Cadenza YG 2016-2025 Owners Manual: Seat belt precautions
Infant or small child All 50 states have child restraint laws. You should be aware of the specific requirements in your state. Child and/or infant seats must be properly placed and installed in the rear seat. For more information about the use of these restraints, refer to “Child re ...
Copyright © www.kcadenzavg.com 2017-2025


