Kia Cadenza: ESC(Electronic Stability Control) System / Front Wheel Speed Sensor Repair procedures
Kia Cadenza YG 2016-2025 Service Manual / Brake System / ESC(Electronic Stability Control) System / Front Wheel Speed Sensor Repair procedures
| Removal |
| 1. |
Remove the front wheel and tire.
|
| 2. |
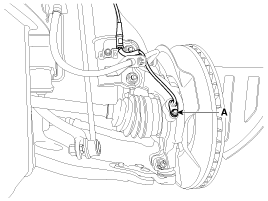
Remove the front wheel speed sensor mounting bolt (A).
|
| 3. |
Remove the front wheel guard . |
| 4. |
Remove the front wheel speed sensor cable mounting bolt. |
| 5. |
Disconnect the front wheel speed sensor connector, then remove the front wheel speed sensor. |
| 6. |
Installation is the reverse of removal. |
| Inspection |
| 1. |
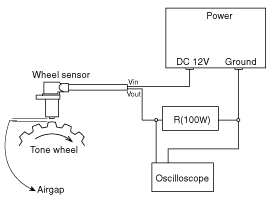
Measure the output voltage between the terminal of the wheel speed sensor and the body ground.
|
| 2. |
Compare the change of the output voltage of the wheel speed sensor to the normal change of the output voltage as shown below.
|
 Front Wheel Speed Sensor Components and Components Location
Components
1. Front wheel speed sensor2. Front wheel speed sensor connector
...
 Rear Wheel Speed Sensor Components and Components Location
Components
1. Rear wheel speed sensor 2. Rear wheel speed sensor cable
...
Other information:
Kia Cadenza YG 2016-2025 Service Manual: Head Lamps Description and Operation
HID Head Lamp 1. Bulb (1) Elements Xenon gas: Xenon gas activates the initial reaction for rapid illuminating. Molybdenum electrode: anode arcing Metal halide salts: color composing component (2) Lightening principle When Xenon gas and metal halide salt will discharge the molybdenum an ...
Kia Cadenza YG 2016-2025 Owners Manual: Driver’s side fuse panel
Inside the fuse/relay panel covers, you can find the fuse/relay label describing fuse/relay name and capacity. ✽ NOTICE Not all fuse panel descriptions in this manual may be applicable to your vehicle. It is accurate at the time of printing. When you inspect the fuse panel in you ...
Copyright © www.kcadenzavg.com 2017-2025


