Kia Cadenza: Air Conditioning System / Photo Sensor Repair procedures
Kia Cadenza YG 2016-2025 Service Manual / Heating,Ventilation, Air Conditioning / Air Conditioning System / Photo Sensor Repair procedures
| Inspection |
| 1. |
Ignition "ON" |
| 2. |
Using the scan tool. |
| 3. |
Emit intensive light toward photo sensor using a lamp, and check the output voltage change. |
| 4. |
The voltage will rise with higher intensive light and reduce with lower intensive light.
|
| Replacement |
| 1. |
Disconnect the negative (-) battery terminal. |
| 2. |
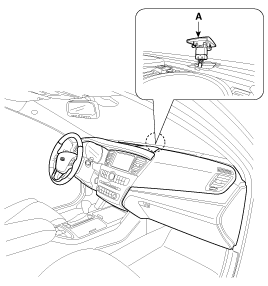
With the (-) driver, remove the photo sensor (A) from the center of defrost nozzle.
|
| 3. |
Install in the reverse order of removal. |
 Photo Sensor Description and Operation
Description
1.
The photo sensor is located at the center of defrost nozzle.
2.
The photo sensor contains a photovoltaic (sensitive to
sunlight) diode. The solar radiation received by its lig ...
 Ambient Sensor Description and Operation
Description
1.
The ambient temperature sensor is located at the front of the
condenser and detects ambient air temperature. It is a negative type
thermistor resistance will increase with lower ...
Other information:
Kia Cadenza YG 2016-2025 Service Manual: Smart key Repair procedures
Smart Key Smart Key Code Saving 1. Connect the DLC cable of GDS to the data link connector in driver side crash pad lower panel, turn the power on GDS. 2. Select the vehicle model and then do "Smart key code saving". 3. After selecting "Smart key teaching" menu, push "Enter" key, then t ...
Kia Cadenza YG 2016-2025 Service Manual: Description and Operation
Description Evaporative Emission Control System prevents fuel vapor stored in fuel tank from vaporizing into the atmosphere. When the fuel evaporates in the fuel tank, the vapor passes through vent hoses or tubes to canister filled with charcoal. The canister temporarily holds the vapor i ...
Copyright © www.kcadenzavg.com 2017-2025
