Kia Cadenza: Power Windows / Power Window Switch Repair procedures
Kia Cadenza YG 2016-2025 Service Manual / Body Electrical System / Power Windows / Power Window Switch Repair procedures
| Inspection |
Driver Power Window Switch
| 1. |
When checking the driver power window switch, select a vehicle type and "IPM" menu. |
| 2. |
Select "DDM (Driver Door Module)". |
| 3. |
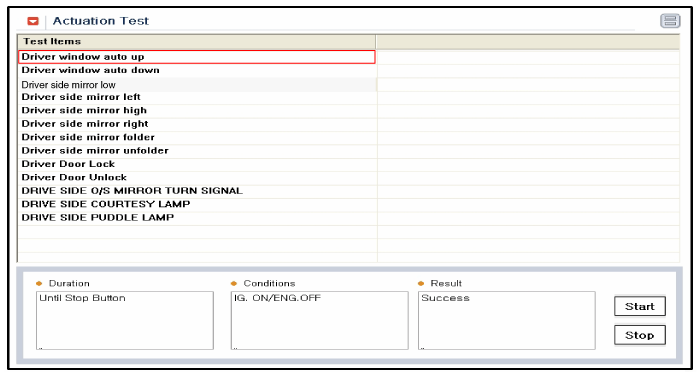
Select option "Input/Output monitoring".
|

| 4. |
To check the input value of power window switch in force mode, select option "ACTUATION TEST".
|
Assist Power Window Switch
| 1. |
When checking the assist power window switch, select a vehicle type and "IPM" menu. |
| 2. |
Select "ADM (Assist Door Module)". |
| 3. |
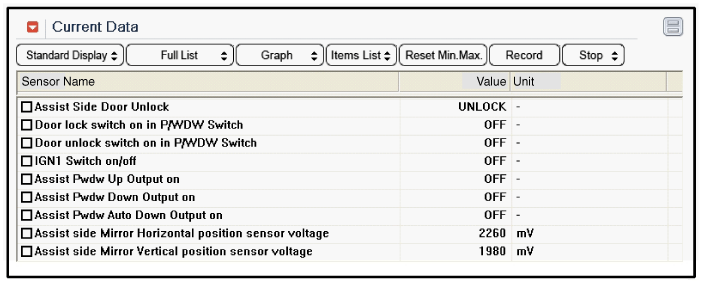
Select option "Input/Output monitoring".
|
| 4. |
To check the input value of power window switch in force mode, select option "ACTUATION TEST".
|

| Removal |
| Driver Power Window Switch |
| 1. |
Disconnect the negative(-) battery terminal. |
| 2. |
Remove the front door trim panel.
(Refer to Body - "Front Door") |
| 3. |
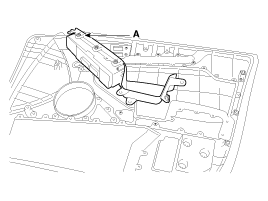
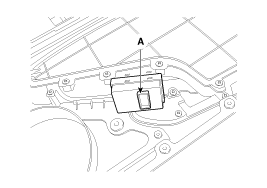
Disconnect the power window switch module connector (A) from the wiring harness.
|

| 4. |
Remove the power window switch module (A) from the door trim after loosening the mounting screws (13EA).
|
| 5. |
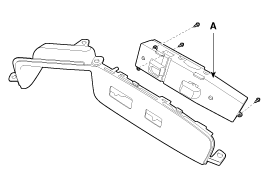
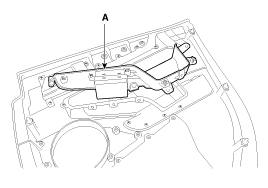
Remove the module (A) from the sub box assembly after loosening the mounting screw (3EA).
|


| Passenger Power Window Switch |
| 1. |
Disconnect the negative (-) battery terminal. |
| 2. |
Remove the rear door trim panel.
(Refer to Body - "Rear Door") |
| 3. |
Disconnect the connector from the power window switch module.
|

| 4. |
Remove the power window switch module (A) from the door trim after loosening the mounting screws (13EA).
|

| 5. |
Remove the module (A) from the sub box assembly after loosening the mounting screw (3EA).
|
| Rear Power Window Switch |
| 1. |
Disconnect the negative (-) battery terminal. |
| 2. |
Remove the rear door trim panel.
(Refer to Body - "Rear Door") |
| 3. |
Disconnect the connector from the power window switch module.
|
| 4. |
Remove the power window switch module (A) from the door trim after loosening the mounting screws (13EA).
|
| 5. |
Remove the module (A) from the sub box assembly. |
| Installation |
| 1. |
Install the power window switch module. |
| 2. |
Install the door trim panel after reconnecting the relevant connectors
|
 Power Window Switch Schematic Diagrams
Circuit Diagram
Driver Power Window Switch (1)
Driver Power Window Switch (2)
Passenger Power Window Swich
Rear Power Window Swich
...

Other information:
Kia Cadenza YG 2016-2025 Owners Manual: Temperature control
The temperature will increase to the maximum (HI) by raise the toggle switch to the extreme up. The temperature will decrease to the minimum (Lo) by depress the toggle switch to the extreme down. When raise and depress the toggle switch, the temperature will increase or decrease by 1 ...
Kia Cadenza YG 2016-2025 Service Manual: Repair procedures
Inspection 1. After disconnecting the vapor hose from the PCV valve, remove the PCV valve. 2. Reconnect the PCV valve to the vapor hose. 3. Inspect the PCV vlave operation. (1) Run the engine at idle. (2) Put a finger on the open end of the PCV valve. (3) Make sure that intake ...
Copyright © www.kcadenzavg.com 2017-2025
