
Kia Cadenza YG: Rear Curtain System / Schematic Diagrams
Kia Cadenza YG 2016-2021 Service Manual / Body Electrical System / Rear Curtain System / Schematic Diagrams
| Circuit Diagram |
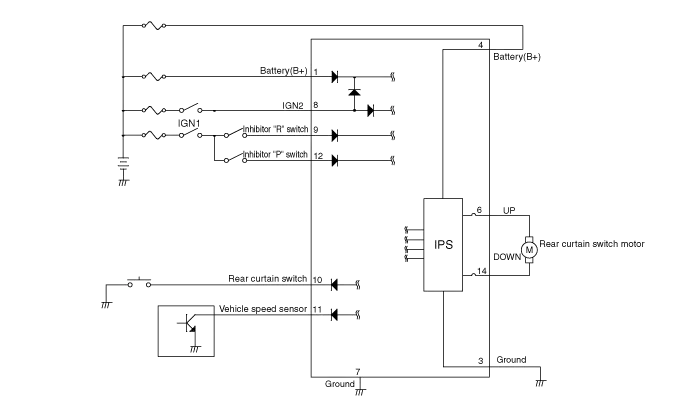
| Rear Curtain Unit Connector |

| PIN NO. | Connector | PIN NO. | Connector |
| 1 | B+ | 8 | IG2 |
| 2 | - | 9 | Inhibitor “R” switch |
| 3 | Power GND | 10 | Rear curtain switch |
| 4 | Power B+ | 11 | Vehicle speed sensor |
| 5 | - | 12 | Inhibitor “P” switch |
| 6 | Motor UP | 13 | - |
| 7 | Signal GND | 14 | Motor DOWN |
Description You can up & down rear curtain automatically by pressing the rear curtain switch. Rear curtain protect passenger from a direct ray of light by covering rear glass.
Inspection Connect the battery voltage and check the rear curtain motor rotation. If the motor does not operate properly, substitute with a known-good rear curtain motor and check for proper operation.
Other information:
Kia Cadenza YG 2016-2021 Service Manual: Special Service Tools
S
Kia Cadenza YG 2016-2021 Service Manual: Evaporator unit Repair procedures
Inspection 1. Ignition "OFF". 2. Disconnect evaporator temperature sensor. 3. Using the multi-tester, Measure resistance between terminal "1" and "2" of evaporator temperature sensor. Specification Evaporator coretemperature [°C(°F)]Resistance[KΩ]Voltage[V]-20(-4)70.
Categories
- Manuals Home
- Kia Cadenza Owners Manual
- Kia Cadenza Service Manual
- Restraint
- Suspension System
- Components and Components Location
- New on site
- Most important about car

Copyright © 2026 www.kcadenzavg.com - 0.0238