Kia Cadenza: Hydraulic System / Valve Body Repair procedures
Kia Cadenza YG 2016-2025 Service Manual / Automatic Transaxle System / Hydraulic System / Valve Body Repair procedures
| Removal |
| 1. |
Remove the under cover.
(Refer to Engine Mechanical System - "Engine Room Under Cover"). |
| 2. |
Remove the ATF drain plug (A), allow the fluid to drain out and then reinstall the drain plug.
|
| 3. |
Remove the battery and battery tray.
(Refer to Engine Electrical System - "Battery") |
| 4. |
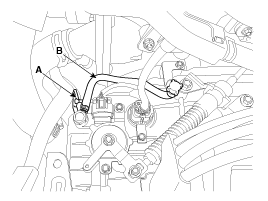
Remove the wiring bracket (A) and the air breather hose (B).
|
| 5. |
Lift the vehicle after loosening valve body cover upper bolts. |
| 6. |
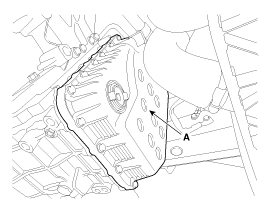
Remove the valve body cover (A) by loosening bolts.
|
| 7. |
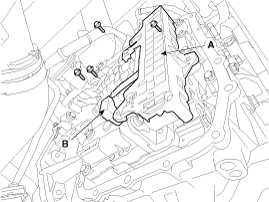
Remove the solenoid valve harness (A) and oil temperature sensor (B) after removing the bolts.
|
| 8. |
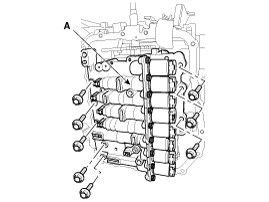
Remove the valve body assembly (A).
|
| Installation |
| 1. |
Install in the reverse order of removal.
|
 Valve Body Components and Components Location
Components Location
1. PCV adjust screw2. Solenoid valve3. Oil temperature sensor4. Accumulator5. Low & reverse brake(LR/B) pressure flow hole6. Under drive brake (UD/B) pressure flow hole
...
 Clutch & Brake
...
Other information:
Kia Cadenza YG 2016-2025 Service Manual: Troubleshooting
Failure Diagnosis 1. In principle, ESC and TCS controls are prohibited in case of ABS failure. 2. When ESC or TCS fails, only the failed system control is prohibited. 3. However, when the solenoid valve relay should be turned off in case of ESC failure, refer to the ABS fail-safe. 4. ...
Kia Cadenza YG 2016-2025 Owners Manual: Armed stage
Park the vehicle and stop the engine. Arm the system as described below. 1. Turn off the engine. 2. Make sure that all doors (and trunk) and engine hood are closed and latched. 3. Lock the doors by depressing the door lock button on the smart key. After completion of the steps above, t ...
Copyright © www.kcadenzavg.com 2017-2025


