Kia Cadenza: Seat & Power Seat / Front Seat Repair procedures
Kia Cadenza YG 2016-2025 Service Manual / Body (Interior and Exterior) / Seat & Power Seat / Front Seat Repair procedures
| Replaccement |
Seat Assembly Replacement
| 1. |
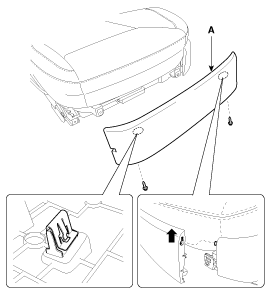
Remove the seat track mounting cover. |
| 2. |
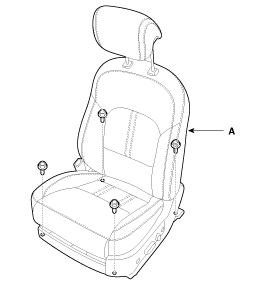
After loosening the seat assembly mounting bolts, remove the seat assembly (A).
|
| 3. |
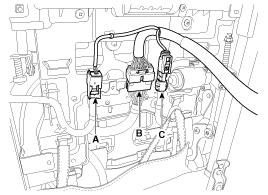
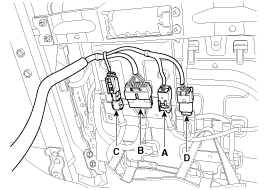
Disconnect the seat buckle connector (A), seat warmer & power seat connector (B), SAB connector(C), PODS connector (D).
[Driver''s]
[Passenger''s]
|
| 4. |
Installation is the reverse of removal.
|
Recliner Cover Replacement
|
| 1. |
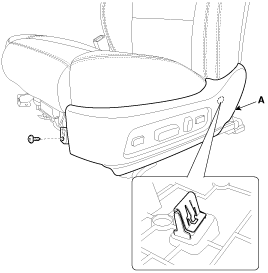
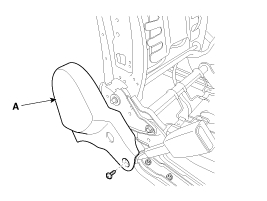
After loosening the mounting screws, then remove the recliner center cover(A).
|
| 2. |
After loosening the mounting screw, then remove the recliner cover (A).
|
| 3. |
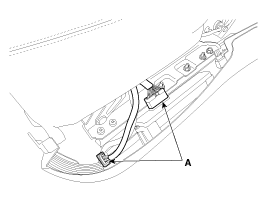
Disconnect the connector (A).
|
| 4. |
Installation is the reverse of removal.
|
Seat Back Replacement
| 1. |
Remove front seat assembly. |
| 2. |
Push the lock pin (B), remove the headrest (A).
|
| 3. |
Remove the protector (A).
|
| 4. |
Disconnect the connectors (A).
|
| 5. |
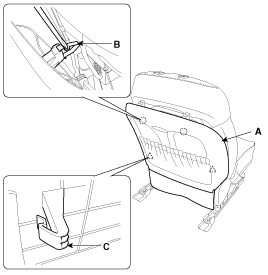
Push the clips (B) and hooks (C) from the seat back board (A).
|
| 6. |
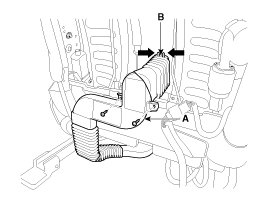
Push the hooks (B), loosen the air ventilation seat duct (A) mounting screws.
|
| 7. |
Push the porotecter (A) by the seat back frame.
|
| 8. |
Remove the rear seat back rear side mounting clip (A).
|
| 9. |
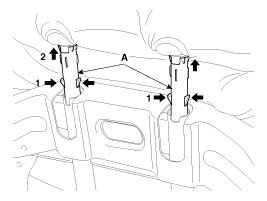
Pull out the headrest guides (A) while pinching the end of the guides, and remove them.
|
| 10. |
Remove the seat back from the frame. |
| 11. |
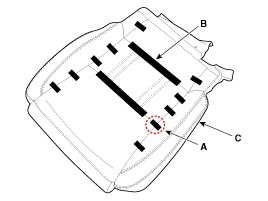
After removing the hogring clips (A) and velcro tape (B) on the front of seat back and remove the seat back cover (C).
|
| 12. |
Installation is the reverse of removal.
|
Seat Cushion Cover Replacement
| 1. |
Remove front seat assembly. |
| 2. |
Remove the recliner cover. |
| 3. |
Remove the protector (A).
|
| 4. |
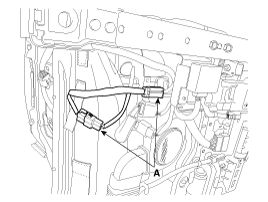
Disconnect the connectors (A).
|
| 5. |
Push the protecter(A), and then seat cushion cover (C) from the frame(B).
|
| 6. |
After removing the hogring clips (A) and velcro tape (B) on the front of seat cushion and remove the seat cushion cover (C).
|
| 7. |
Installation is the reverse of removal.
|
Seat Frame Replacement
| 1. |
Remove the following items :
|
| 2. |
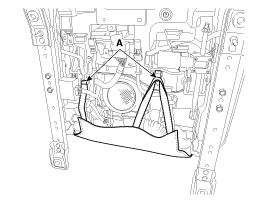
After loosening the mounting screw, then remove the front seat inner shield cover (A).
|
| 3. |
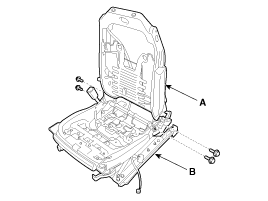
After loosening the mounting bolts, then disconnect the seat back frame (A) and seat cushion frame (B).
|
| 4. |
Installation is the reverse of removal. |
 Front Seat Components and Components Location
Components
1. Headrest2. Headrest guide3. Front seat back pad4. Front seat back warmer5.Front seat back cover6. Front seat back board7. Front seat back frame8. Front seat cushion cover9. Front se ...
 Rear Seat Components and Components Location
Components
1. Rear luggage bar2. Headrest3. Headrest guide4. Rear back armrest5. Web guide6. Rear seat back pad7. Sab support bracket8. Rear back heater unit assembly9. Rear seat back frame assem ...
Other information:
Kia Cadenza YG 2016-2025 Service Manual: Front Hub - Axle Components and Components Location
Components 1. Coking nut2. Brake disc3. Hub4. Dust cover5. Knuckle6. Wheel bearing7. Snap ring8. Drive shaft ...
Kia Cadenza YG 2016-2025 Service Manual: Components and Components Location
Components 1. Front seat belt2. Height adjuster3. Rear seat belt (RH)4. Rear center seat belt5. Rear seat belt (LH)6. Rear center seat belt buckle ...
Copyright © www.kcadenzavg.com 2017-2025


