Kia Cadenza: Windshield Wiper/Washer / Front Washer Motor Repair procedures
Kia Cadenza YG 2016-2025 Service Manual / Body Electrical System / Windshield Wiper/Washer / Front Washer Motor Repair procedures
| Inspection |
| 1. |
With the washer motor connected to the reservoir tank, fill the reservoir tank with water.
|
| 2. |
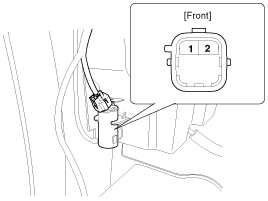
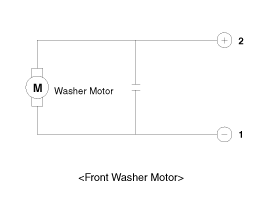
Connect positive (+) battery cables to terminal 1 and negative (-) battery cables to terminal 2 respectively. |
| 3. |
Check that the motor operates normally and the washer motor runs and water sprays from the front nozzles. |
| 4. |
If they are abnormal, replace the washer motor.
|
Washer Fluid Level Sensor Switch
| 1. |
Disconnect the negative(-) battery terminal. |
| 2. |
Drain the washer fluid less than 650 cc. |
| 3. |
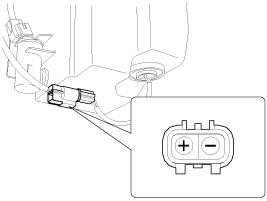
Check for continuity between the No. 1 and No.2 terminal in each float position.
There should be continuity when the float is down.
There should be no continuity when the float is up. |
| 4. |
If the continuity is not as specified, replace the washer fluid level switch.
|
| Removal |
|
| 1. |
Disconnect the negative (-) battery terminal. |
| 2. |
Remove the front bumper.
(Refer to Body - "Front Bumper") |
| 3. |
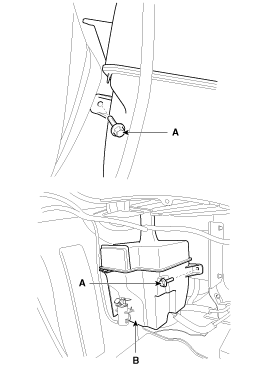
Remove the washer hose (B) and disconnect the washer motor connector (A).
|
| 4. |
Remove the washer motor (A).
|
| 5. |
Remove the washer reservoir (B) after removing 2 bolts (A).
|
| Installation |
| 1. |
Install the washer reservoir.
|
| 2. |
Install the washer motor. |
| 3. |
Install the washer hose. |
| 4. |
Connect the washer motor connector and level sensor connector. |
| 5. |
Install the front bumper. |
| 6. |
Check the washer motor operation. |
 Front Wiper Motor Repair procedures
Removal
1.
Loosen the windshield wiper arm nut (B) after removing a wiper cap (A).
2.
Remove the windshield wiper arm and blade (A).
3.
If necessary, release the wiper blade fixing clip by ...
 Rain Sensor Schematic Diagrams
Circuit Diagram
...
Other information:
Kia Cadenza YG 2016-2025 Owners Manual: Certification label
The certification label is located on the driver's door sill at the center pillar. This label shows the maximum allowable weight of the fully loaded vehicle. This is called the GVWR (Gross Vehicle Weight Rating). The GVWR includes the weight of the vehicle, all occupants, fuel and car ...
Kia Cadenza YG 2016-2025 Service Manual: Parking Brake Assembly Components and Components Location
Components (1) 1. Parking brake pedal2. Parking brake cable3. Equalizer assembly Components (2) 1. Backing plate2. Brake shoe3. Shoe hold clip4. Bolt ...
Copyright © www.kcadenzavg.com 2017-2025


