Kia Cadenza: Power Windows / Power Window Motor Repair procedures
Kia Cadenza YG 2016-2025 Service Manual / Body Electrical System / Power Windows / Power Window Motor Repair procedures
| Inspection |
Front Power Window Motor Inspection
| 1. |
Remove the front door trim panel.
(Refer to Body - "Front Door") |
| 2. |
Disconnect the connector from the motor.
|
| 3. |
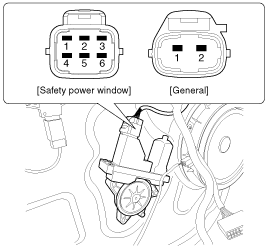
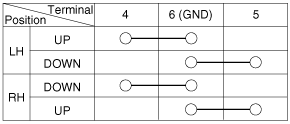
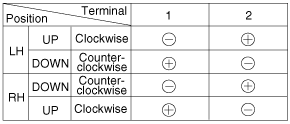
Connect the terminal No. 1 and No. 2 to battery voltage (12V)
and terminal No. 6 to battery (-). And then check that the motor
operates smoothly when connecting the terminals below.
If the operation is abnormal, replace the motor.
[Safety Power Window]
|
| 4. |
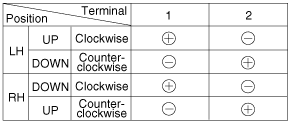
Connect the motor terminals directly to battery voltage (12V)
and check that the motor operates smoothly. Next, reverse the polarity
and check that the motor operates smoothly in the reverse direction. If
the operation is abnormal, replace the motor.
[General]
|
Rear Power Window Motor Inspection
| 1. |
Remove the rear door trim panel.
(Refer to Body - "Rear Door") |
| 2. |
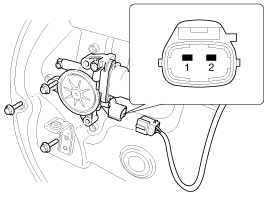
Disconnect the 2P connector from the motor.
|
| 3. |
Connect the motor terminals directly to battery voltage (12V)
and check that the motor operates smoothly. Next, reverse the polarity
and check that the motor operates smoothly in the reverse direction. If
the operation is abnormal, replace the motor.
|
 Power Window Motor Schematic Diagrams
Circuit Diagram
...
 Power Window Switch Schematic Diagrams
Circuit Diagram
Driver Power Window Switch (1)
Driver Power Window Switch (2)
Passenger Power Window Swich
Rear Power Window Swich
...
Other information:
Kia Cadenza YG 2016-2025 Service Manual: Troubleshooting
Engine Overheat Troubleshooting Inspection RemedyVisual inspectionInspect for shortage of coolant in reservoir tank .Reinspect after replenishing coolant.Inspect for coolant pollution after removing radiator cap. Be careful when removing radiator cap from overheat ...
Kia Cadenza YG 2016-2025 Service Manual: Barometric Pressure Sensor (BPS) Repair procedures
Inspection 1. Connect the GDS on the Data Link Connector (DLC). 2. Measure the output voltage of the BPS at idle and IG ON. Specification: Refer to "Specification" Removal 1. Turn the ignition switch OFF and disconnect the battery negative (-) cable. 2. Disconnect the barome ...
Copyright © www.kcadenzavg.com 2017-2025


