Kia Cadenza: Parking Brake System / Parking Brake Assembly Repair procedures
Kia Cadenza YG 2016-2025 Service Manual / Brake System / Parking Brake System / Parking Brake Assembly Repair procedures
| Removal |
Parking Brake Pedal
| 1. |
Remove the main crash pad. (Refer to the Body group-crash pad) |
| 2. |
Remove the cowl cross bar. (Refer to the Body group - Crash pad) |
| 3. |
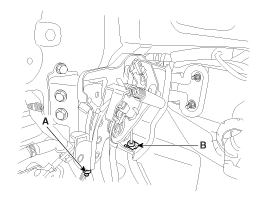
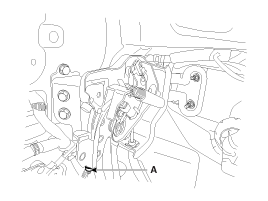
Disconnect the parking brake switch connector (A).
|

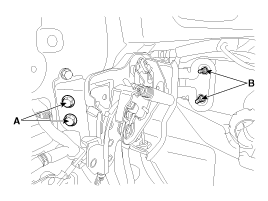
| 4. |
Remove the parking brake pedal mounting bolts (A) and nut.(B)
|

| 5. |
Remove the parking brake cable mounting bolts. |
| 6. |
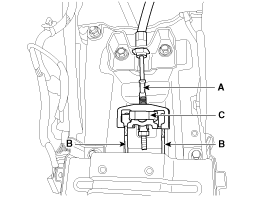
Remove the parking brake cable adjusting nut(A) and the fixing clip(B), and then remove the parking brake pedal.
|
| 7. |
Remove the floor console. (Refer to the Body group - Console) |
| 8. |
Remove the paring brake cable (A, B) after removing the cable retainer (C).
|
| 9. |
Loosen the cable fixing clip and bolts and remove front parking brake cable. |
| 10. |
Raise the vehicle, and make sure it is securely supported. |
| 11. |
Remove the rear tire and wheel. |
| 12. |
Remove the parking brake cable (B) after removing the fixing clip (A).
|

| 13. |
Loosen the parking brake cable bracket bolts and remove the rear parking brake cable. |
Parking Brake Shoe
| 1. |
Raise the vehicle, and make sure it is securely supported. |
| 2. |
Remove the rear tire and wheel. |
| 3. |
Remove the rear brake caliper and Rear disc brake.
(Refer to "Rear disc brake removal") |
| 4. |
Remove the parking brake cable (B), after removing the fixing clip (A).
|
| 5. |
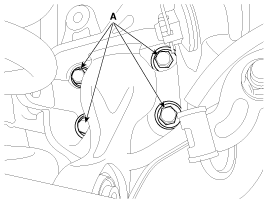
Loosen the hub assembly mounting bolts (A), and the remove the hub assembly and parking brake assembly.
|
| 6. |
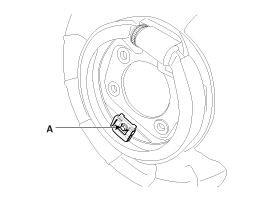
Loosen the shoe hold clip mounting bolt (A), and then remove the brake shoe.
|
| Installation |
Parking Brake Shoe
| 1. |
Install the brake shoe. |
| 2. |
Fix the brake shoe with shoe hold clip, and then install the bolt (A).
|
| 3. |
Install parke brake assembly and hub assembly. |
| 4. |
Install the parking brake cable (B), then install the fixing clip (A).
|
| 5. |
Install the rear brake disc, then adjust the rear brake shoe clearance.
|
| 6. |
Install the brake caliper assembly. (Refer to "Rear brake installation") |
| 7. |
Install the tire and wheel, after installing the plug on the disc. |
| 8. |
If the parking brake shoe or the brake disc are replaced a newly one, perform the brake shoe bed-in procedure.
|

Parking Brake Pedal
| 1. |
Install the parking brake cable. |
| 2. |
Install the floor console. (Refer to the Body group - console) |
| 3. |
Install the holding clip (B) and the cable adjusting nut(A) after fixing the parking brake cable.
|
| 4. |
Install the parking brake pedal, and then install the parking brake pedal mounting bolts (A) and nuts (B).
|
| 5. |
Adjust the parking brake pedal stroke by turning the adjusting nut (A).
|
| 6. |
Reconnect the parking brake switch connector(A).
|
| 7. |
Install the cowl cross bar. (Refer to the Body group - Crash pad) |
| 8. |
Install the main crash pad. (Refer to Body group - Crash pad) |
| Adjustment |
Parking Brake Shoe Clearance Adjustment
| 1. |
Raise the vehicle, and make sure it is securely supported. |
| 2. |
Remove the rear tire and wheel. |
| 3. |
Remove the plug (A) from the disc. |
| 4. |
Rotate the toothed wheel of adjuster by a screw driver until
the disc is not moving, and then return it by 5 notches in the opposite
direction. |
| 5. |
Install the rear wheel & tire after installing the plug on the disc. |
Parking Brake Pedal Stroke Adjustment
| 1. |
Operate the parking brake pedal through a full stroke over 3 times for setting the parking cables. |
| 2. |
Adjust the adjusting nut(A) for parking barke pedal stoke 4~5 notches when operating effort is 196N(20kgf, 44lbf)
|
 Parking Brake Assembly Components and Components Location
Components (1)
1. Parking brake pedal2. Parking brake cable3. Equalizer assembly
Components (2)
1. Backing plate2. Brake shoe3. Shoe hold clip4. Bolt
...
 Electric Parking Brake (EPB) Components and Components Location
Components
1. EPB Unit2. EPB Switch3. Brake Caliper 4. EPB Warning Lamp5. AUTO HOLD Lamp
...
Other information:
Kia Cadenza YG 2016-2025 Owners Manual: System setting
The driver can change LKA to Lane Departure Warning (LDW) or change the LKA mode Selecting “Settings > Vehicle > Driver Assistance > Lane Safety > Lane Keeping Assist/Lane Departure Warning/Off” in the Infotainment System screen. Lane Keeping Assist LKA mode guides the ...
Kia Cadenza YG 2016-2025 Owners Manual: Highway Driving Assist (HDA)
Highway Driving Assist helps keep the vehicle between lanes, maintain a distance with the vehicle ahead, and automatically adjusts the vehicle speed to the speed limit while driving on the highway. WARNING HDA is not a substitute for safe driving practices, but a convenience fun ...
Copyright © www.kcadenzavg.com 2017-2025
