Kia Cadenza: Windshield Wiper/Washer / Rain Sensor Repair procedures
Kia Cadenza YG 2016-2025 Service Manual / Body Electrical System / Windshield Wiper/Washer / Rain Sensor Repair procedures
| Inspection |
Rain Sensing Wiper
| 1. |
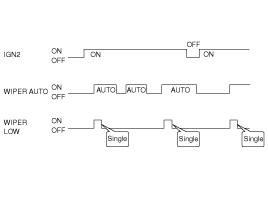
In IGN2 ON state, if auto switch input (LIN communication) is
ON then both wiper low relay and wiper high relay outputs are
controlled by the rain sensor input signal. |
| 2. |
If the wiper switch has been left in automatic mode with the
vehicle ignition OFF, and then the vehicle ignition switch is turned on,
a single wipe will be performed.
|
| 3. |
A single wipe will be performed whenever rain has been
detected (Rain Detected signal from Rain sensor) and the wiper switch is
moved to the AUTO position. But a single wipe will not be performed
when the wiper switch is moved to the AUTO position and OFF signal is
being received from Rain sensor. But if the wiper switch is moved to
AUTO position for the first time since vehicle ignition switch is turned
on then a single wipe will be performed regardless of Rain Detected or
OFF signal.
|
| 4. |
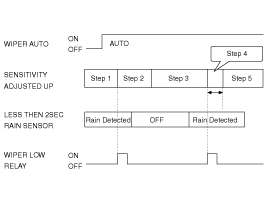
The drive may adjust the rain sensor performance by adjusting
the sensitivity input. When in automatic mode, the BCM will perform a
single wipe each time the sensitivity is adjusted upward to a more
sensitive setting (downward more then one step). This single wipe will
only be performed if Rain Detected signal is being received from the
Rain sensor. If the sensitivity adjustment is adjusted upward more than
one sensitivity, the BCM will only perform a single wipe unless the time
between Increases is more than 2 seconds.
|
| 5. |
Fault strategy for the rain sensor
Rain Sensor Fault 1 - Internal Fault Detected
This failure is detected when the wiper is in automatic mode
and the input faulty rain sensor from the rain sensor has a duty cycle
corresponding to Fault 1. The confirmation delay for the failure is of 1
sec.
When this failure is detected, the wiper outputs are OFF and
the wiper will also do a wipe in slow speed on the transition from
sensitivity 3 to sensitivity 2 (Step 2 to 3) in order to signal the
presence of this fault. If another sensitivity is set, the wiper won’t
make any additional wipe.
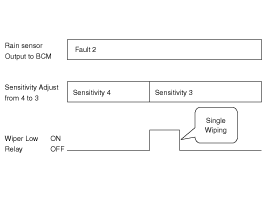
Rain Sensor Fault 2 - Glass Attachment Fault Detected
This failure is detected when the wiper is in automatic mode
and the input faulty rain sensor from the rain sensor has a duty cycle
corresponding to Fault 2. The confirmation delay for the failure is of 1
s.
When this failure is detected, the wiper outputs are OFF and
the wiper will also do a wipe on the transition from sensitivity 4 to
sensitivity 3 (Step 1 to 2) in order to signal the presence of this
fault. If another sensitivity is set, the wiper won’t make any
additional wipe.
Rain Sensor Fault 3 - No Input Signal Present
This failure is detected when the wiper is in automatic mode
and the input faulty rain sensor from the rain sensor has a duty cycle
corresponding to Fault 3 or in case the duty cycle of the input faulty
rain sensor is 0% or 100%. The confirmation delay for the failure is of 1
s.
When this failure is detected, the wiper outputs are OFF. |
| Removal |
The rain sensor may not operate properly if contaminated.
Protect the rain sensor surface by not removing the cover until
installation time. The coupling pad on the rain sensor surface has
adhesive strength. Take care when installing the sensor. If the sensor
is separated from the windshield by force, the sensor or windshield may
be damaged. Take care when removing the sensor. |
| 1. |
Remove the rain sensor cover (A) first.
Be careful not to damage the cover latch by applying
excessive force. To remove the latch, pull aside the latch using the
cover hole (B) with the little (-) screwdriver (C).
|
| 2. |
Remove the wiring harness connector from sensor. |
| 3. |
Rain sensor module is attached to the front windshield by
glue replacing the front windshield, remove the rain sensor module from
the existing front windshield and install on the new front windshield. |
| Installation |
|
| 1. |
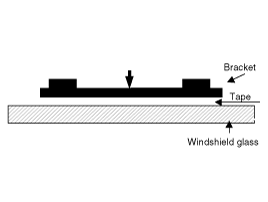
Install the rainsensor bracket to the windshield glass using the tape.
|
| 2. |
Connect the rainsensor connector, and then install the sensor cover. |
 Rain Sensor Description and Operation
Description
The Rain sensing windshield wiper system is a wiper system
that, in addition to providing normal wiper functions off, mist, manual
low speed, manual high speed, and wash, provides a ...
Other information:
Kia Cadenza YG 2016-2025 Owners Manual: Brake operation
CAUTION The driver should always pay great caution to vehicle operation, even though there is no warning message or warning alarm. If any other warning sound such as seat belt warning chime is already generated, Forward Collision-Avoidance Assist warning may not soun ...
Kia Cadenza YG 2016-2025 Service Manual: ESC OFF Switch Repair procedures
Inspection 1. Turn ignition switch OFF and disconnect the negative (-) battery cable. 2. Remove the passenger compartment juction box cover. 3. Remove the crash pad side switch assembly (A) by pushing it through juction box cover hole. Put on gloves to prote ...
Copyright © www.kcadenzavg.com 2017-2025


