Kia Cadenza: Interior / Roof Trim Repair procedures
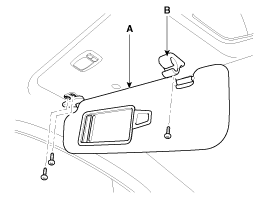
Sunvisor Replacement
•
When prying with a flat-tip screwdriver, wrap it with protective tape to prevent damage.
•
Put on gloves to protect your hands.
1.
Loosen the mounting screws, then remove the sunvisor (A) and retainer (B).
2.
Installation is the reverse of removal.
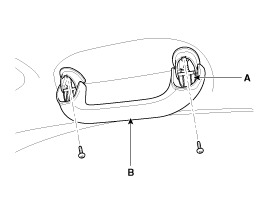
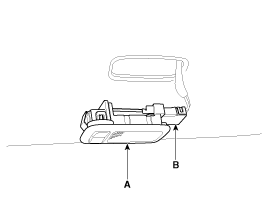
Assist Handle Replacement
•
When prying with a flat-tip screwdriver, wrap it with protective tape to prevent damage.
•
Put on gloves to protect your hands.
1.
Remove the covers (A) and screws, then remove the assist handle (B).
2.
Installation is the reverse of removal.
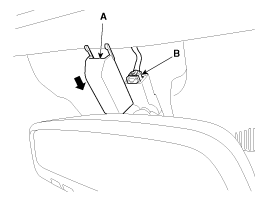
Deluxe Overhead Lamp Replacement
•
When prying with a flat-tip screwdriver, wrap it with protective tape to prevent damage.
•
Put on gloves to protect your hands.
1.
After loosening the mounting bolts, remove the deluxe overhead lamp(A).
2.
Disconnect the connector (A).
3.
Installation is the reverse of removal.
•
Make sure the connector is plugged in properly.
•
Replace any damage clips.
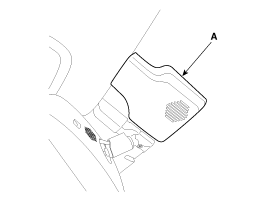
Vanity Lamp Replacement
1.
Using a screwdriver or remover, remove the vanity lamp (A).
2.
Disconnect the vanity lamp connector (B).
3.
Installation is the reverse of removal.
•
Make sure the connector is plugged in properly.
Roof Trim Replacement
•
Put on gloves to protect your hands.
•
When prying with a flat-tip screwdriver, wrap it with protective tape to prevent damage.
•
Take care not to bend or scratch the trim and panels.
1.
Remove the following items:
•
Front seat
(Refer to the BD group - "Front Seat")
•
Rear seat
(Refer to the BD group - "Rear Seat")
•
Front pillar trim
(Refer to the BD group - "Interior Trim")
•
Front door scuff trim & Rear door scuff trim
(Refer to the BD group - "Interior Trim")
•
Canter pillar lower trim
(Refer to the BD group - "Interior Trim")
•
Canter pillar upper trim
(Refer to the BD group - "Interior Trim")
•
Rear pillar trim
(Refer to the BD group - "Interior Trim")
2.
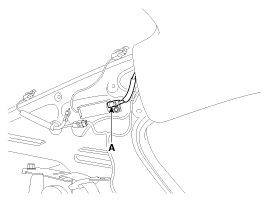
Remove the ECM mirror cover (A).
3.
Disconnect the ECM mirror connector (B).
4.
Remove the auto defog sensor & rain sensor cover (A).
5.
Disconnect the auto defog sensor connector (A) and rain sensor connector (B).
6.
Remove the LDWS cover (A).
7.
Disconnect the LDWS connector (A).
8.
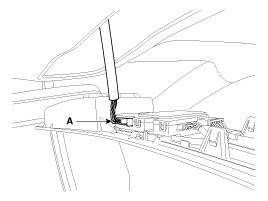
Disconnect the roof trim main connectors (A).
[Driver''s]
[Passenger''s]
9.
Disconnect the antenna connector (A).
[LH]
[RH]
10.
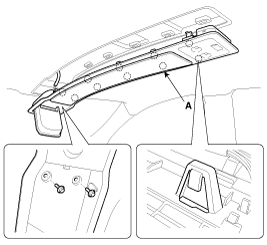
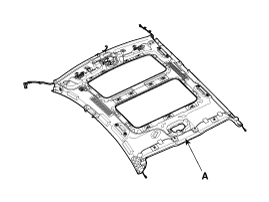
Remove the clips and roof trim (A).
11.
Installation is the reverse of removal.
•
Replace any damage clips.
•
Make sure the connector is plugged in properly.
Components
1. Roof trim2. Sunvisor3. Retainer4. Assist handle bracket
Components (Panoramaroof)
1. Roof trim2. Sunvisor3. Retainer4. Assist handle bracket
...
Components
1. Front pillar trim2. Center pillar upper trim3. Center pillar lower trim4. Rear pillar trim5. Cowl side trim6. Front door scuff trim7. Rear door scuff trim8. Rear package tray tri ...
Other information:
Circuit Diagram
SVM System Input/Output
1.
Camera input
ItemSpecificationLens angle of view190 degreesAngle of viewHorizontal186 degreesVertical135 degreesFunctionProvides the original image of the wide angle image (no additional function)Application locationSame camera applied to the f ...
The Engine Start/Stop button must
be on for the turn signals to function.
To turn on the turn signals, move the
lever up or down (A). The green
arrow indicators on the instrument
panel indicate which turn signal is
operating.
They will self-cancel after a turn is
completed. If the i ...


 Roof Trim Components and Components Location
 Interior Trim Components and Components Location